Tuesday, March 29, 2016

The Clay Coaster


These marbleized coasters are A-M-A-Z-I-N-G. Who ever thought clay could look this good? I was inspired by Sarah Johnson to make these, and I am absolutely in love with the way that they turned out. I'd have to say, my kindergarten clay modeling skills have come a long way and I bet yours have too! Details on how I made these beauties are below.

Supplies:
Sculpey oven-bake clay (pick an assortment of colors)
Clay cutting tools (I bought these)
Parchment paper
Sculpey gloss glaze
Paint brush
Gold liquid gilding
Clay roller
Cocktail glass

"Roll Out":
  1. Break off pieces of clay in the desired colors that you want to use for your coaster. I broke off about 1/4 (of the 2oz package) of clay per color per coaster. 
  2. On a clean surface, use your hands to roll out each color so that they are somewhat even in length and width. Don't worry if it isn't perfect, the variation creates an interesting effect. 
  3. Twist all of your colors together, then roll. 
  4. Fold the mixed clay in half, twist again, and roll. Repeat this step at least 2x. 
  5. Form a ball of clay and use your roller to flatten the ball evenly. You want each coaster to be about 1/4" thick. 
  6. Place the bottom of your cocktail glass on the marbleized section of the clay that you love the most and use your cutting tool to trace a circle around the glass. 
  7. Remove the excess clay and put the coaster on your parchment paper. Use your finger to smooth out any bumps on the top and sides of the coaster. 
  8. Preheat the oven to 275 degrees.
  9. Bake the coasters for 30 minutes. 
  10. Once the coasters have baked, allow them to cool to room temperature. 
  11. Using a small brush, apply the liquid gold gilding to the side and top edge of the coaster. Allow adequate time for the gold gilding to dry.
  12. Seal your coasters. Apply the Sculpey gloss glaze to the top of the coaster. This will protect your clay masterpieces from liquids. 


Tuesday, March 22, 2016

The Paper Ribbon


PAPER. RIBBONS. Need I say more? My mom taught me how to make these in college and I have been making them like crazy ever since. You can use them to accessorize your office bulletin board or to up your gift wrapping game. The possibilities are endless. 

Supplies: 

Instructions: 
  • Flatten your tart pan. Turn the tart pan upside down and hammer until flat. 
  • Cut your scrapbook paper. Using your paper trimmer, cut three strips of scrapbook paper 3/8"-5/8" in width. 
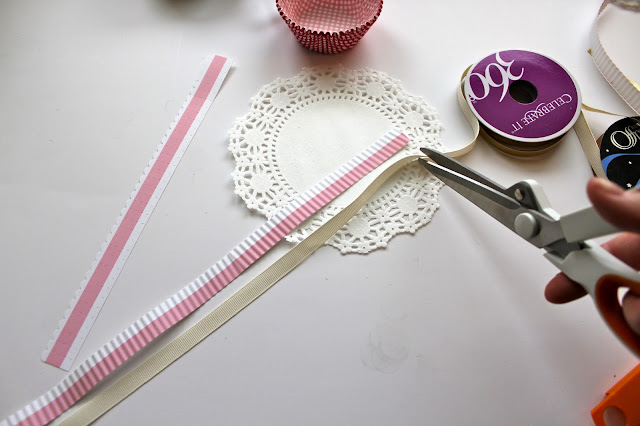
  • Cut two 3/8" ribbon strips to match the length of your paper strips. 
  • Crimp your paper strips. Place one end of the paper strip in between the crimper and begin to turn the handle. Continue to turn the handle until the strip is fully crimped. This adds a nice dimensional effect. 
  • Cut a piece of paper to fit the rosette die. Place the paper in between the die and the cutting pad. Place the sandwiched paper, die and cutting pad onto your Sizzix machine. Turn the handle on the machine and continue to turn it until the die has passed through the rollers. Your die-cut shape is ready! If you can't figure out how to use the machine, this instruction manual is super helpful. 
  •  Remove the excess paper from your die-cut shapes. I used the larger die-cut shape for my ribbon. 
  • Fold the paper back and forth along the perforated lines. Your piece of paper should look like an accordion. 
  • Adhere the ends of the accordion die-cut shape with liquid glue. It should look like a bottomless cupcake wrapper. 
  • Cut 2 paper circles with your paper punch. 
  • Place your fingers on the inside of the die-cut shape and push out and up. It should look somewhat like a windmill. Keep your finger in the middle of the shape to keep it from losing its form. Apply glue to one of your paper circles and adhere it to the top of the die-cut shape. I suggest holding your finger there until the glue has sufficiently dried. If not, the paper won't hold and it will revert back to the bottomless cupcake wrapper. 
  • Turn the shape over and adhere the second paper circle to the middle. 
  • Flatten a cupcake wrapper. Apply hot glue to the back of your flattened tart pant and adhere to the wrapper. 
  • Apply hot glue to the back of the die-cut shape and secure it to the middle of the tart pan. 
  • Adhere the paper strips and ribbon to the middle of the doily with hot glue. 
  • Adhere the cupcake wrapper to the doily. 
  • Embellish. I used hot glue to add a rose accessory to the middle of the die-cut shape and I used pearl borders to add dimension to my cream ribbon. You can go crazy with embellishments, so get creative! 


Tuesday, March 15, 2016

Cranberry Ginger Fizz

Who doesn't love a good cocktail? I am by no means a mixologist, but I love trying and creating new drinks (especially if they include gin).  These were so much fun to make and were absolutely delicious! If you are a crazy cocktail lover like myself, you have to make this drink at your next soirĂ©e. 


Ingredients:
1 cup cranberries (I used frozen cranberries because they weren't in season)
1/2 lemon, cut into wedges
1/4 orange, cut into slices
2.5 shots of gin (Hendrick's Gin is my favorite)
1 cup chilled ginger ale
2 mint sprigs

Yield: 2 cocktails

Instructions:

Place 2 tablespoons drained cranberries, lemon wedges and orange slices into a cocktail shaker. 

Using a muddler, mash the fruit.

Stir in gin and let sit for at least 5 minutes.

Fill 2 glasses with ice and 1/2 cup ginger ale.

Fill the cocktail shaker with ice and shake vigorously for 10 seconds and pour into the glasses.

Add additional ice to each glass and garnish with 3 cranberries and a mint sprig.


Tuesday, March 8, 2016

The Milk Glass Effect


I am so excited to share this post with everyone! This is by far one of my favorite projects to date. I have always been a lover of antique milk glass and I figured out a way to replicate the 3-dimensional aspect with liquid glass. The best part about this DIY, on top of it looking like something you picked up at Homegoods, is that the entire project is under $10. 

Supplies: 
  • Liquid glass
  • Rubbing alcohol
  • Cotton ball
  • Spray paint (I used Rust-Oleum White Lacquer and gold)
  • Glassware of your choice (I bought the two larger vases from the Dollar Tree and the small vase from Michaels)
  • Paper plate
The Effect:
  1. Place your glassware top down on a paper plate. 
  2.  In order to remove any smudges and dust from the glassware, soak your cotton ball in rubbing alcohol and rub it around the outside of the vase.
  3. Open your liquid glass and test it on a separate piece of paper to get a feel for the pressure that you want to apply to get your desired effect. 
  4. Start your design. I decided to do polka dots on all of my vases, but you certainly don't have to. For my design, I worked from the top down. Make sure to rotate your paper plate as you move on to different sections. You do not want to touch the glassware until everything is dry. 
  5. Once you are done, let the vase dry for 30 or so minutes. The liquid glass will turn from a milky white to clear when it is fully dry. Depending on how crazy you got with your design, your dry time may take a little longer.
  6. Start spraying! I did two to three coats of the gold and white lacquer. 


I recently taught my first DIY class. Below are a couple of pictures of my students making their milk glass projects!