Showing posts with label DIY. Show all posts

Thursday, January 25, 2018

DIY Clothing Rack


Tiny closet or no closet at all? This easy (and under $100) copper rack is such a fun and functional project that will instantly give you more space, while looking stylish at the same time!

With the shrinking apartments and sky-high rent around DC and NY (and the even smaller/non-existent closets), it leaves us fashionistas with few options on where to store our precious pieces. My shopping habit has gotten a bit out of control and there may never be a large enough closet to fit all of my fun and bright pieces. I know this isn't an issue that only I face since most of my friends that live in big cities have bulky, industrial clothing racks (that aren't that cute) taking up half their bedroom! Hence the inspiration for this DIY. This copper clothing rack uses simple copper materials from Home Depot for under $100!!! In addition, the size can be totally customized to fit your space. All you have to do is adjust the long pipe lengths. What could be better than that??

This clothing rack is not only functional, but it's stylish. I wanted to style it because I figured what could be prettier than a rack of colorful summer Katie Kime dresses? Copper makes the rack look so much more chic than a typical one you would find at Bed Bath & Beyond or the Container Store. Functional and FABULOUS!

What you will need:
1. (5) 1/2" x 5' pipe
2. (6) 1/2" pipe elbows
3. (2) 1/2" caps
4. (8) 1/2" tees 
5. (6) 1/2" x 5" pipe (custom cut)
6. (6) 1/2" x 2" pipe (custom cut)
7. Loctite 
*Home Depot will custom cut your pipes for FREE :)
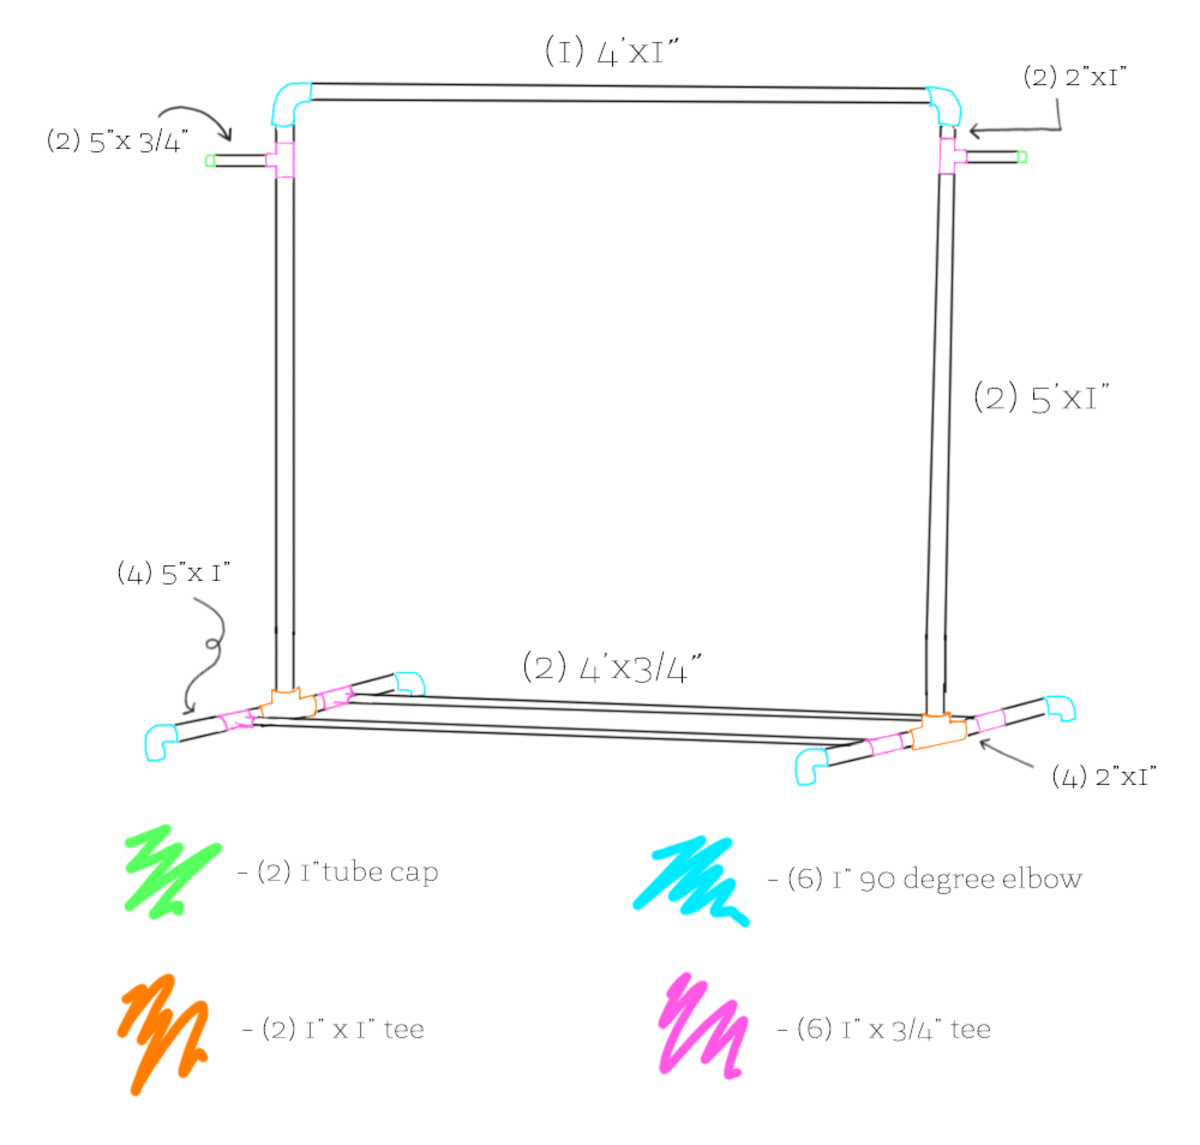
UpdatedCopperRackDoodleColored+Legend.png

Inspiration Credit: Cupcakes & Cashmere, another amazing DIYer, originally created this DIY and put together a wonderful drawing that should help you better visualize how to assemble the rack. Please note that she uses 1" piping, whereas I used 1/2" piping. 


Saturday, December 9, 2017

Houzz Home Tour


The hours spent cleaning finally paid off. I'm so excited to officially reveal my home tour and collaboration with Houzz! Checkout the article for more pictures and details! 

Tuesday, August 8, 2017

Stitch & B$tch


Stitching and b$tching - a new obsession of mine. Sewing is making a comeback, but in a different way and with a different demographic, Generation Y. The traditional "Home Sweet Home" cross-stitch pattern that was once hanging in your mother's kitchen isn't all that popular anymore. Instead, "Home of where the Fart is" and pop culture references that better resonate with Generation Y are the patterns that are selling and trendy.

For my wedding, my mother made an amazing hand stitched handkerchief that said "Keep Your Shit Together." It was personal, special, hysterical, and obviously a great DIY. Hence, I had to make one myself to share with you! I figured "No Ugly Crying" was quite fitting and appropriate for a handkerchief. We all know that cinched up, somewhat unattractive look our face makes when the tears are about to roll. It's certainly not cute, at least not for me.  Anyway, this is the perfect DIY if you can't think of a good, personalized gift for a friend that is getting married. It's a humorous keepsake that he or she will for sure treasure.


What you need:
- Light box
Template to Download - I included a couple of different "No Ugly Crying" styles for you to choose from
- Pencil (6B) for tracing
- Embroidery needle
- Embroidery floss
- White handkerchief - I love scallops, so I bought these
- Tape

Get it done:
1. Print out your template and tape it to the light box.
2. Place your handkerchief over the paper template and use your 6B pencil to trace around the letters.
3. Start stitching! If you don't know how to sew, don't stress! There are so many YouTube tutorials out there for you to watch and learn. :)


Tuesday, August 2, 2016

Vintage Picnic


A vintage 1950's suitcase + Katie Kime fabric + TLC = BEST PICNIC TRUNK EVER. My mom and I found this gem at an antique store awhile back and I instantly knew what I wanted to do with it. If you have a couple of hours, grab an old suitcase and your favorite fabric. You will be popping bubbly and picnicking in no time. 

  • Remove the old lining. 
  • Clean the suitcase to get rid of any dirt and/or smell. I used Clorox and Windex. 
  • Use the removed lining as a template and trace around it on flat pieces of cardboard. 
  • Cut the cardboard with a razor. 
  • Cut a piece of fabric for each piece of cardboard that is about a half inch larger on all sides. You want to make sure that there is a little extra so that you can fold it over the back to secure with glue.
  • Glue the fabric to the cardboard and clamp until dry. 
  • Decide on what picnic items you want to create an elastic holder for and measure/cut your elastic accordingly. 
  • Poke holes into each side of the elastic and push a gold brad through. 
  • Measure and mark the area for where you want to attach the elastic to the fabric covered cardboard. Use a drill to make your holes. 
  • Insert the brads into each hole and fold back the legs to secure the elastic to the board. 
  • Adhere each cardboard piece to the interior of the suitcase with tacky glue and clamp. Allow for adequate dry time. 
Time to picnic!!! 


Tuesday, June 7, 2016

A Fun TWIST on Pretzels


OMG is right! Who doesn't love a good pretzel? These letter-shaped pretzels are AMAZING and quite delicious. I have never made homemade pretzels before, so it was quite the learning experience. Although my letters didn't turn out 100% perfect, they were still so much fun to make and are the epitome of edible cuteness. If you are looking for a fun project to do with friends, and you have a couple of hours, the pretzel letters are a must!

Cookie cutters - I bought 3" letters from Sur La Table

Pretzel Recipe:
— 1 1/2 cups warm water
— 1 tablespoon sugar
— 2 teaspoons salt
— 4 1/2 cups of flour
— 1 packet of dry yeast
— 1/4 cup butter, melted
— 10 cups water
— vegetable oil
— 2/3 cup baking soda
— 1 egg yolk
— pretzel salt for dusting

1. Pour the warm water, sugar and salt into a mixing bowl. Sprinkle the packet of yeast over the water and let sit for five minutes.
2. Add the flour and the melted butter and mix until the dough is smooth. 
3. Rub another bowl with vegetable oil and place the dough inside. Cover with a towel and place in a warm place. Allow the dough to rise for one hour.
4. Preheat your oven to 450 degrees and grease your baking sheet. Pour 10 cups of water and 2/3 cup baking soda in the pot on the stove and bring to a boil.
5. Place it on a floured surface and use your palms or a rolling pin to flatten the dough to about 1/2-inch thick.
6. Use your alphabet cookie cutters to cut out your desired letters. Place them on the oiled baking sheet.
7. Once the water in the pot has come to a boil, drop in the pretzel dough and leave to sit for 30 seconds. Remove from the water with a slotted spatula and place back onto the baking sheet. Repeat for each letter.
8. In a separate bowl, mix an egg yolk with one teaspoon of water.
9. Brush the tops of the dough and sprinkle with pretzel salt.
10. Place the pretzels in the oven for 9-10 minutes or until browned.

ENJOY!

*Recipe/how-to via Sam Ushiro


Tuesday, May 24, 2016

Marble Tray DIY


Today I'm talking DIY marble trays! Awhile back my neighbor was redoing his bathroom and had a bunch of leftover marble tiles he was throwing away. I snagged a couple and naturally decided to upcycle them into trays. I'll get to the delicious pizza how-to, but for now, let's DIY marble tiles.

Materials:
  • Marble tile
  • Hardware 
    • I got mine from Home Depot. Brass hardware can be pricey, so I sprayed mine in gold lacquer. I  created this nifty paint stand (foam + kabob sticks) for the hardware so that I could ensure even paint coverage on the underside of the pull. 
  • Ruler
  • Whiteboard marker
  • E6000 adhesive  
  • Felt bumpers
DIY Details:
  • Spray your hardware. 
  • Use your ruler and whiteboard marker to measure and mark where to place the hardware. I decided to place my hardware .5" from each side edge and 1" from the top and bottom edges.  
  • Apply the adhesive to the feet of the pull and place on the tray. 
  • Dry. Allow for adequate dry time. 
  • Apply felt bumpers to the back of the tray. 
  • Use to mis en place or to style your decor accessories. I used it for both!
I don't know about you guys, but I am a pizza fanatic. I could literally eat pizza, with ranch obviously, for every meal. Thank god I don't, otherwise I would weigh 1,000 pounds.  I included my quick and easy pizza recipe since I'm sure that all you have been thinking about since you started reading this post is the pizza pictured above. :)

Recipe:
  • Tandori bread
  • Mozzarella
  • Basil
  • Tomato
  • Olive oil
  • McCormick's Mediterranean spiced sea salt
  1. Preheat the oven to 275 degrees. 
  2. Mix olive oil and McCormick's Mediterranean spiced sea salt in a small bowl. 
  3. Cut mozzarella and tomato slices. 
  4. Use a basting brush to apply the olive oil mixture to the tandori bread slices. 
  5. Add the mozzarella and tomato slices to the tandori. 
  6. Cook for roughly 10-15 minutes (or until the mozzarella has melted). 
    • I put the basil on about 3-4 minutes before the pizza is done.
  7. Nom dot com. It's time to eat. Cheers! 


Here is how I styled some of my bedroom accessories!


Tuesday, May 3, 2016

The Key to Chalkboard Lettering


Have you ever wondered how coffee shops and restaurants create their perfect chalkboard menus? Well, I'm a craft nerd so I obviously pondered this question and decided to do a little research. The results? You don't need to be a calligraphy expert to create perfect chalkboard lettering. If you can trace, then you can make a sign that looks just as professional.

I have wedding planning on my mind and rather than booking the photographer or band, creating this bar sign seemed far more important #priorities. I am so excited to share more of my wedding DIY ideas with you over the next year. There are so many great ways to decorate on a budget in order to save for the more important things on your special day.

Materials:
Tree stump slice
- I got mine from HomeGoods, but Target has this one.
White chalk
Liquid chalk pen
Pencil
Tape
Black chalk paint
Sponge brush
Printout of your lettering/phrase
Q-tips

  1. Use your sponge brush and chalk paint to outline the circle on the wood slice. Fill in with even strokes. 
  2. Repeat Step 1 two more times. I allowed each layer of paint to dry for approximately 10-15 minutes. 
  3. Turn your printout over and cover the back of the paper with chalk. 
  4. Position your printout on the chalkboard as desired and tape it down. 
  5. Using your pencil, trace around each letter. 
  6. Remove the printout. You should be left with a faint outline of your lettering/phrase. 
  7. Use your liquid chalk pen to trace over the outline. 
  8. Use dry Q-tips to rub off all excess chalk. Don't worry about rubbing it over the liquid chalk lettering, as it won't smudge. Only water will remove the liquid chalk.