Tuesday, May 31, 2016

Flower Power


My mom and I recently took a peony flower arrangement class with the oh-so-talented Holly Chapple, and it was spectacular! I have always called myself a crazy flower lady and this class was right up my alley.  It's amazing how each student was given the same flowers, yet each arrangement was so creative and different. All you need is plastic-coated chicken wire, floral tape, a vase, and flowers/foliage to make this peony masterpiece. If I could create this beauty, you certainly can too!

Holly has recently started offering classes for the community and you can find her schedule of events here. I encourage you to try one out if you can!


Tuesday, May 24, 2016

Marble Tray DIY


Today I'm talking DIY marble trays! Awhile back my neighbor was redoing his bathroom and had a bunch of leftover marble tiles he was throwing away. I snagged a couple and naturally decided to upcycle them into trays. I'll get to the delicious pizza how-to, but for now, let's DIY marble tiles.

Materials:
  • Marble tile
  • Hardware 
    • I got mine from Home Depot. Brass hardware can be pricey, so I sprayed mine in gold lacquer. I  created this nifty paint stand (foam + kabob sticks) for the hardware so that I could ensure even paint coverage on the underside of the pull. 
  • Ruler
  • Whiteboard marker
  • E6000 adhesive  
  • Felt bumpers
DIY Details:
  • Spray your hardware. 
  • Use your ruler and whiteboard marker to measure and mark where to place the hardware. I decided to place my hardware .5" from each side edge and 1" from the top and bottom edges.  
  • Apply the adhesive to the feet of the pull and place on the tray. 
  • Dry. Allow for adequate dry time. 
  • Apply felt bumpers to the back of the tray. 
  • Use to mis en place or to style your decor accessories. I used it for both!
I don't know about you guys, but I am a pizza fanatic. I could literally eat pizza, with ranch obviously, for every meal. Thank god I don't, otherwise I would weigh 1,000 pounds.  I included my quick and easy pizza recipe since I'm sure that all you have been thinking about since you started reading this post is the pizza pictured above. :)

Recipe:
  • Tandori bread
  • Mozzarella
  • Basil
  • Tomato
  • Olive oil
  • McCormick's Mediterranean spiced sea salt
  1. Preheat the oven to 275 degrees. 
  2. Mix olive oil and McCormick's Mediterranean spiced sea salt in a small bowl. 
  3. Cut mozzarella and tomato slices. 
  4. Use a basting brush to apply the olive oil mixture to the tandori bread slices. 
  5. Add the mozzarella and tomato slices to the tandori. 
  6. Cook for roughly 10-15 minutes (or until the mozzarella has melted). 
    • I put the basil on about 3-4 minutes before the pizza is done.
  7. Nom dot com. It's time to eat. Cheers! 


Here is how I styled some of my bedroom accessories!


Tuesday, May 17, 2016

Margs? Hell Yeah!


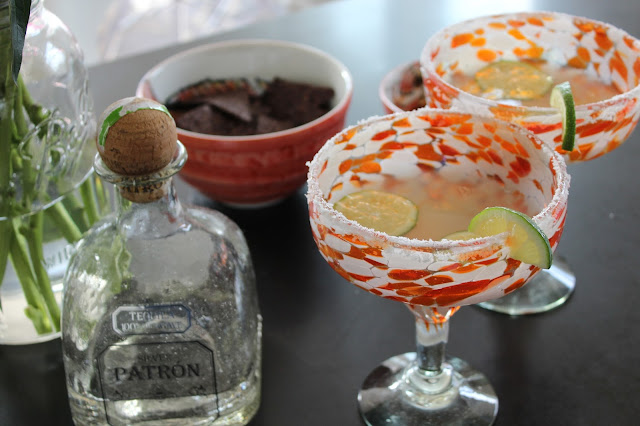
No matter if it's Tuesday or Friday, we could all use a margarita, or two, to make it through the work week! Plus, who doesn't love a night in with their girlfriends and my man, Jose? Grab a couple of cute margarita glasses (mine are from HomeGoods) and get to mixing. This recipe will not disappoint.


Ingredients:
3 limes
1 tablespoon of blue agave nectar - you can add more if you like yours a little sugary
1.5 tablespoons of water
Rimming salt
3 oz tequila
2 oz triple-sec
Ice

Serving size: 2

Just always remember 3-2-1: three parts tequila, two parts triple-sec, 1 part lime juice.
  1. Fill a shaker with ice and add tequila, triple-sec, lime juice (2 limes), and blue agave. Then, shake and bake baby. 
  2. With your third lime, cut a lime wedge and rub it around the rim of the margarita glass. 
  3. Pour salt onto a plate and dip the glass, rotating until the entire rim is covered. 
  4. Add ice to the glasses and strain the margarita mix. Cut extra lime slices to add as garnish. 
  5. Cheers! Don't forget the chips, salsa, and queso! 


Tuesday, May 10, 2016

The Tassel Trend


It's about time you ride in style and up your key chain game. If you haven't noticed, tassels are kind of a big deal right now. From necklaces to purses to scarves, tassels are everywhere. Once you make one of these key chains, you will certainly be addicted. They turn out so stinkin' cute that you won't want to give any of them away. You have been warned - this DIY may create key chain hoarding tendencies.  :)

I learned how to make these tassels by reading a bunch of blogs and watching some videos. I would have to say that Damask Love is really the one who nailed it. She is amazing and a super talented DIY/craft blogger that I follow. Make sure to check her site out!

Don't feel like making a key chain, but want one? I am now accepting orders. Shoot me an email with your order (color, quantity, etc.) and I will be happy to make you however many you would like!

Supplies:
8"x 10" Leather sheet - I order all of my leather from PeggySueAlso
Scissors
Stapler
Leather cement 
Ruler
Rotary cutter
Snap hooks
Pen

Details:
  1. Measure and cut a 2.5" x 10" strip of leather with your rotary cutter.
  2. Measure and cut a .5" x 4" strip of leather with your rotary cutter/scissors.
  3. On your 2.5" x 10" piece of leather, measure 1" down from the top and draw a horizontal line. 
  4. Use your ruler to measure and mark 1/8" fringe (each fringe piece is about 1/8" x 1.5"). You don't have to measure every single fringe piece if you don't want to. It can be somewhat monotonous, so feel free to eyeball the measurements. 
  5. Use your scissors to cut each fringe piece up to the 1" horizontal line.
  6. Attach the .5" x 4" piece of leather to the left edge of the fringed leather strip with a stapler. 
  7. Loop the .5"x 4" piece of leather through the snap hook and secure to the left hand corner of the fringed leather strip with the stapler again. 
  8. Apply dabs of leather cement about 1" apart along the top of the fringed leather strip. 
  9. Tightly roll your tassel and hold firmly together for about one minute. 
  10. Apply a small amount of leather cement to the top of the tassel to ensure adhesion. 


I recently taught a DIY class on this craft in Silver Spring. 
Below are photos of some of my students and their creations!